How to auto start a program
1 – Use the crontab
In this first part, I’ll go directly to the main point: how to start any script or program on boot.
For the example, I’ll use my test script which is in the Desktop folder, so /home/pi/Desktop/test.sh.
The crontab also add the possibility to start a script on boot, with the @reboot option.
That’s a first solution you can use to start your program automatically, and probably the easiest one to remember in this list.
Here is how to do this:
- Open a terminal
- **Open the crontab file
**crontab -e
If’s your first time in the crontab, you need to select an editor
You get an empty crontab file, it looks like this:
- Paste a line starting with reboot, and add your script command just after, like this:
@reboot /home/pi/Desktop/test.sh - Save and exit (CTRL+O, CTRL+X with nano).
Your task is now scheduled to start at each boot.
2 – Put your script in /etc/init.d
The second solution you can use is to create your script under /etc/init.d.
I generally prefer this method for something like a service (like a firewall script for example).
As I wrote in introduction, it’s not the best way to do to respect the guidelines, but it works ![🙂]
However, there is a minimal format to respect for the script to start it on boot.
Here how to do this:
- Create a new file in /etc/init.d:
sudo nano /etc/init.d/myservice
Change the file name to make it explicit. - Paste these lines (for example):
!/bin/bash
### BEGIN INIT INFO
# Provides: MyService
# Required-Start:    $all
# Required-Stop:
# Default-Start:     5
# Default-Stop:      6
# Short-Description: Your service description
### END INIT INFO
touch /home/pi/myservice_test
- The comments at the beginning are mandatory to make it start on boot (runlevel 5).
Change the service name and description to explain what your script is doing. - Save your file and exit (CTRL+X).
- Add the execution permission to your script:
sudo chmod +x /etc/init.d/myservice - Finally, you need to tell the system to start it on boot by using this command:
sudo update-rc.d myscript defaults
That’s really the minimum to make it work.
The goal here is just to run a script on boot.
If you want to do this properly, you need to add at least start, stop and restart option to your service.
You can find a detailed documentation here if that’s what you want to do.
Reboot to try, if all is correct your script should run once every time you start your Raspberry Pi.
3 – Create an upstart job
The third option is to create an upstart job.
In the previous Raspbian version, it was possible to handle this graphically, but on Raspbian Buster it seems to be unavailable.
Let me know if you find a solution on Raspbian Desktop.
So, here is how to do this with a configuration file:
- Create a file in /etc/init (not init.d!)
sudo nano /etc/init/myjob.conf - Paste the following content:
description “my job”
start on startup
task
exec /home/pi/Desktop/test.sh
- Don’t forget to adapt the file name and description to remember what it is
That’s all!
Just creating this file is enough to make it work at each boot.
Bonus:
There is no graphical way to do this, but you can manage which upstart job you want to run on next boot:
- Go in the Main Menu > Parameters > Main Menu Editor.
- Browse to Main Menu > Parameters and check the “Desktop Session Settings” box:
- Close this window and go back to Main Menu > Parameters, then open Desktop Session Settings:
- Here you can check which upstart job is configured, and enable or disable them:
4 – Add a line in /etc/rc.local
Finally, the rc.local method is probably the easiest one as you just need to remember the file name to know what to do 
The rc.local file is a script intended for the system administrator (you!).
On boot, it’s one of the last things executed (at the end of the multi-user run level).
So, it’s exactly what you need to run a custom service.
Here is how to use it:
- Open the rc.local file:
sudo nano /etc/rc.local - Insert your script or service just before the “exit 0” line
Something like this: - Save and exit (CTRL+X)
That’s already done, nothing else to do.
You can reboot now to try it if you want.
Find the command to start
Before trying the previous solutions to auto start a program on boot, you may need some help to know exactly what to run.
Sadly, Raspbian Buster doesn’t include a tool to start apps on boot, so you have to find the corresponding command line.
As I don’t know exactly what you want to run, I will give you the three options.
Create a script
If your goal is to create a script, the command line will be easy to find, it’s the path and the script name.
eval(ez_write_tag([[468,60],‘raspberrytips_com-box-2’,‘ezslot_14’,157,‘0’,‘0’]));How to Auto Start a Program on Raspberry Pi? (4 ways)
Written by Patrick Fromagetin How-To Tutorials
eval(ez_write_tag([[468,60],‘raspberrytips_com-box-3’,‘ezslot_16’,158,‘0’,‘0’]));Starting a script on boot is not really intuitive, whatever your system.
It’s a question I often see, so I chose to create an entire post about it.
You’re probably trying to start a script or an app, that’s mandatory in your setup, automatically on boot.
It’s not so complicated, you have several ways, I’ll show you everything.
eval(ez_write_tag([[300,250],‘raspberrytips_com-medrectangle-3’,‘ezslot_3’,159,‘0’,‘0’]));How to auto start a program on Raspberry Pi?
There are several solutions to automatically start a program on boot.
The first one is to put your script into the /etc/init.d folder and configure an auto-start.
On Raspbian Desktop, the easiest way is to use the Desktop Sessions Settings.
eval(ez_write_tag([[580,400],‘raspberrytips_com-medrectangle-4’,‘ezslot_4’,160,‘0’,‘0’]));So yes, it’s possible, but you need to find the solution that fit your needs.
You can also choose to follow “the good practices”, or keep only the simplest solution to remember.
That’s often my favorite choice, I don’t care about good practices when I’m the only one to use the device.
Let’s go!
Table of Contents
How to auto start a program
In this first part, I’ll go directly to the main point: how to start any script or program on boot.
For the example, I’ll use my test script which is in the Desktop folder, so /home/pi/Desktop/test.sh.
You need to change this line with the script or program you want to run
If you have no idea which command you need to type, check the second part of this guide
eval(ez_write_tag([[300,250],‘raspberrytips_com-box-4’,‘ezslot_2’,161,‘0’,‘0’]));
1 – Use the crontab
**Cron is a service, automatically started at each boot of the Raspberry Pi, which allows the user to execute scheduled commands.
**A crontab is a file that will allow us to list what we want to start and when to start it, in a format understandable by the cron service.
eval(ez_write_tag([[580,400],‘raspberrytips_com-banner-1’,‘ezslot_1’,103,‘0’,‘0’]));
The crontab has many options to start a script at a specific time or regularly (daily, weekly, 3 times a month, etc.).
By the way, I have a post about this specifically that you can check to know more.
But that’s not what we are looking for.
The crontab also add the possibility to start a script on boot, with the @reboot option.
That’s a first solution you can use to start your program automatically, and probably the easiest one to remember in this list.
Here is how to do this:
- Open a terminal
- **Open the crontab file
**crontab -e
If’s your first time in the crontab, you need to select an editor (press Enter for nano).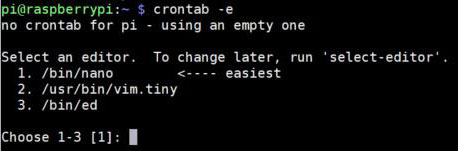
- You get an empty crontab file, it looks like this:
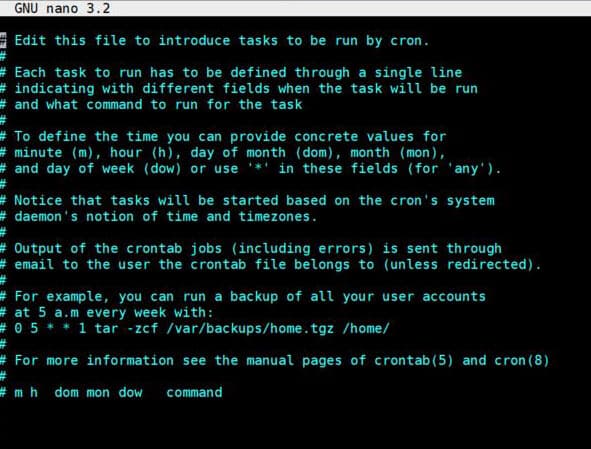
- Paste a line starting with reboot, and add your script command just after, like this:
@reboot /home/pi/Desktop/test.sh - Save and exit (CTRL+O, CTRL+X with nano).
Your task is now scheduled to start at each boot.

Raspberry Pi Course
Sale: 10% off today. Take it to the next level.
I’m here to help you get started on Raspberry Pi, and learn all the skills you need in the correct order.
2 – Put your script in /etc/init.d
The second solution you can use is to create your script under /etc/init.d.
I generally prefer this method for something like a service (like a firewall script for example).
As I wrote in introduction, it’s not the best way to do to respect the guidelines, but it works
However, there is a minimal format to respect for the script to start it on boot.
Here how to do this:
- Create a new file in /etc/init.d:
sudo nano /etc/init.d/myservice
Change the file name to make it explicit. - Paste these lines (for example):
!/bin/bash
BEGIN INIT INFO
Provides: MyService
Required-Start: $all
Required-Stop:
Default-Start: 5
Default-Stop: 6
Short-Description: Your service description
END INIT INFO
touch /home/pi/myservice_test
- The comments at the beginning are mandatory to make it start on boot (runlevel 5).
Change the service name and description to explain what your script is doing. - Save your file and exit (CTRL+X).
- Add the execution permission to your script:
sudo chmod +x /etc/init.d/myservice - Finally, you need to tell the system to start it on boot by using this command:
sudo update-rc.d myscript defaults
That’s really the minimum to make it work.
The goal here is just to run a script on boot.
eval(ez_write_tag([[300,250],‘raspberrytips_com-large-leaderboard-2’,‘ezslot_5’,162,‘0’,‘0’]));If you want to do this properly, you need to add at least start, stop and restart option to your service.
You can find a detailed documentation here if that’s what you want to do.
Reboot to try, if all is correct your script should run once every time you start your Raspberry Pi.
3 – Create an upstart job
The third option is to create an upstart job.
In the previous Raspbian version, it was possible to handle this graphically, but on Raspbian Buster it seems to be unavailable.
Let me know if you find a solution on Raspbian Desktop.
So, here is how to do this with a configuration file:
- Create a file in /etc/init (not init.d!)
sudo nano /etc/init/myjob.conf - Paste the following content:
description “my job”
start on startup
task
exec /home/pi/Desktop/test.sh
- Don’t forget to adapt the file name and description to remember what it is
eval(ez_write_tag([[300,250],‘raspberrytips_com-leader-1’,‘ezslot_6’,163,‘0’,‘0’]));That’s all!
Just creating this file is enough to make it work at each boot.
Bonus:
There is no graphical way to do this, but you can manage which upstart job you want to run on next boot:
- Go in the Main Menu > Parameters > Main Menu Editor.
- Browse to Main Menu > Parameters and check the “Desktop Session Settings” box:
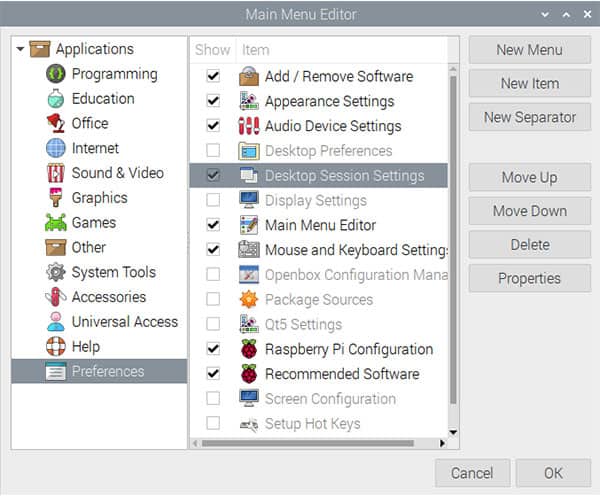
- Close this window and go back to Main Menu > Parameters, then open Desktop Session Settings:
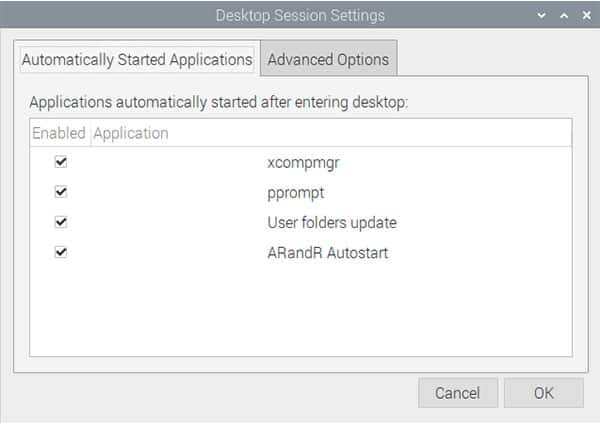
- Here you can check which upstart job is configured, and enable or disable them:
4 – Add a line in /etc/rc.local
Finally, the rc.local method is probably the easiest one as you just need to remember the file name to know what to do
The rc.local file is a script intended for the system administrator (you!).
On boot, it’s one of the last things executed (at the end of the multi-user run level).
So, it’s exactly what you need to run a custom service.
Here is how to use it:
- Open the rc.local file:
sudo nano /etc/rc.local - Insert your script or service just before the “exit 0” line
Something like this: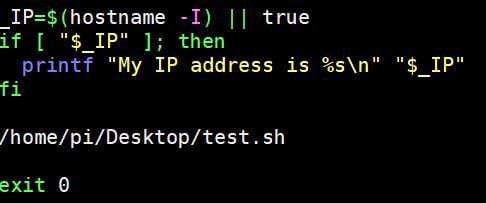
- Save and exit (CTRL+X)
That’s already done, nothing else to do.
You can reboot now to try it if you want.
Find the command to start
Before trying the previous solutions to auto start a program on boot, you may need some help to know exactly what to run.
Sadly, Raspbian Buster doesn’t include a tool to start apps on boot, so you have to find the corresponding command line.
As I don’t know exactly what you want to run, I will give you the three options.
Create a script
If your goal is to create a script, the command line will be easy to find, it’s the path and the script name.
For example, if your script is in /usr/local/bin and the script name is start_script.sh.
You can use the following command in one of the 4 previous solutions to start your script on boot:/usr/local/bin/start_script.sh
Don’t forget to add the execution permission with:chmod +x /usr/local/bin/start_script.sh
eval(ez_write_tag([[468,60],‘raspberrytips_com-box-2’,‘ezslot_14’,157,‘0’,‘0’]));How to Auto Start a Program on Raspberry Pi? (4 ways)
Written by Patrick Fromagetin How-To Tutorials
eval(ez_write_tag([[468,60],‘raspberrytips_com-box-3’,‘ezslot_16’,158,‘0’,‘0’]));Starting a script on boot is not really intuitive, whatever your system.
It’s a question I often see, so I chose to create an entire post about it.
You’re probably trying to start a script or an app, that’s mandatory in your setup, automatically on boot.
It’s not so complicated, you have several ways, I’ll show you everything.
eval(ez_write_tag([[300,250],‘raspberrytips_com-medrectangle-3’,‘ezslot_3’,159,‘0’,‘0’]));How to auto start a program on Raspberry Pi?
There are several solutions to automatically start a program on boot.
The first one is to put your script into the /etc/init.d folder and configure an auto-start.
On Raspbian Desktop, the easiest way is to use the Desktop Sessions Settings.
eval(ez_write_tag([[580,400],‘raspberrytips_com-medrectangle-4’,‘ezslot_4’,160,‘0’,‘0’]));So yes, it’s possible, but you need to find the solution that fit your needs.
You can also choose to follow “the good practices”, or keep only the simplest solution to remember.
That’s often my favorite choice, I don’t care about good practices when I’m the only one to use the device.
Let’s go!
Table of Contents
How to auto start a program
In this first part, I’ll go directly to the main point: how to start any script or program on boot.
For the example, I’ll use my test script which is in the Desktop folder, so /home/pi/Desktop/test.sh.
You need to change this line with the script or program you want to run
If you have no idea which command you need to type, check the second part of this guide
eval(ez_write_tag([[300,250],‘raspberrytips_com-box-4’,‘ezslot_2’,161,‘0’,‘0’]));
1 – Use the crontab
**Cron is a service, automatically started at each boot of the Raspberry Pi, which allows the user to execute scheduled commands.
**A crontab is a file that will allow us to list what we want to start and when to start it, in a format understandable by the cron service.
eval(ez_write_tag([[580,400],‘raspberrytips_com-banner-1’,‘ezslot_1’,103,‘0’,‘0’]));
The crontab has many options to start a script at a specific time or regularly (daily, weekly, 3 times a month, etc.).
By the way, I have a post about this specifically that you can check to know more.
But that’s not what we are looking for.
The crontab also add the possibility to start a script on boot, with the @reboot option.
That’s a first solution you can use to start your program automatically, and probably the easiest one to remember in this list.
Here is how to do this:
- Open a terminal
- **Open the crontab file
**crontab -e
If’s your first time in the crontab, you need to select an editor (press Enter for nano). - You get an empty crontab file, it looks like this:
- Paste a line starting with reboot, and add your script command just after, like this:
@reboot /home/pi/Desktop/test.sh - Save and exit (CTRL+O, CTRL+X with nano).
Your task is now scheduled to start at each boot.
Raspberry Pi Course
Sale: 10% off today. Take it to the next level.
I’m here to help you get started on Raspberry Pi, and learn all the skills you need in the correct order.
2 – Put your script in /etc/init.d
The second solution you can use is to create your script under /etc/init.d.
I generally prefer this method for something like a service (like a firewall script for example).
As I wrote in introduction, it’s not the best way to do to respect the guidelines, but it works
However, there is a minimal format to respect for the script to start it on boot.
Here how to do this:
- Create a new file in /etc/init.d:
sudo nano /etc/init.d/myservice
Change the file name to make it explicit. - Paste these lines (for example):
!/bin/bash
BEGIN INIT INFO
Provides: MyService
Required-Start: $all
Required-Stop:
Default-Start: 5
Default-Stop: 6
Short-Description: Your service description
END INIT INFO
touch /home/pi/myservice_test
- The comments at the beginning are mandatory to make it start on boot (runlevel 5).
Change the service name and description to explain what your script is doing. - Save your file and exit (CTRL+X).
- Add the execution permission to your script:
sudo chmod +x /etc/init.d/myservice - Finally, you need to tell the system to start it on boot by using this command:
sudo update-rc.d myscript defaults
That’s really the minimum to make it work.
The goal here is just to run a script on boot.
eval(ez_write_tag([[300,250],‘raspberrytips_com-large-leaderboard-2’,‘ezslot_5’,162,‘0’,‘0’]));If you want to do this properly, you need to add at least start, stop and restart option to your service.
You can find a detailed documentation here if that’s what you want to do.
Reboot to try, if all is correct your script should run once every time you start your Raspberry Pi.
3 – Create an upstart job
The third option is to create an upstart job.
In the previous Raspbian version, it was possible to handle this graphically, but on Raspbian Buster it seems to be unavailable.
Let me know if you find a solution on Raspbian Desktop.
So, here is how to do this with a configuration file:
- Create a file in /etc/init (not init.d!)
sudo nano /etc/init/myjob.conf - Paste the following content:
description “my job”
start on startup
task
exec /home/pi/Desktop/test.sh
- Don’t forget to adapt the file name and description to remember what it is
eval(ez_write_tag([[300,250],‘raspberrytips_com-leader-1’,‘ezslot_6’,163,‘0’,‘0’]));That’s all!
Just creating this file is enough to make it work at each boot.
Bonus:
There is no graphical way to do this, but you can manage which upstart job you want to run on next boot:
- Go in the Main Menu > Parameters > Main Menu Editor.
- Browse to Main Menu > Parameters and check the “Desktop Session Settings” box:
- Close this window and go back to Main Menu > Parameters, then open Desktop Session Settings:
- Here you can check which upstart job is configured, and enable or disable them:
4 – Add a line in /etc/rc.local
Finally, the rc.local method is probably the easiest one as you just need to remember the file name to know what to do
The rc.local file is a script intended for the system administrator (you!).
On boot, it’s one of the last things executed (at the end of the multi-user run level).
So, it’s exactly what you need to run a custom service.
Here is how to use it:
- Open the rc.local file:
sudo nano /etc/rc.local - Insert your script or service just before the “exit 0” line
Something like this: - Save and exit (CTRL+X)
That’s already done, nothing else to do.
You can reboot now to try it if you want.
Find the command to start
Before trying the previous solutions to auto start a program on boot, you may need some help to know exactly what to run.
Sadly, Raspbian Buster doesn’t include a tool to start apps on boot, so you have to find the corresponding command line.
As I don’t know exactly what you want to run, I will give you the three options.
Create a script
If your goal is to create a script, the command line will be easy to find, it’s the path and the script name.
eval(ez_write_tag([[300,250],‘raspberrytips_com-large-mobile-banner-1’,‘ezslot_7’,165,‘0’,‘0’]));For example, if your script is in /usr/local/bin and the script name is start_script.sh.
You can use the following command in one of the 4 previous solutions to start your script on boot:/usr/local/bin/start_script.sh
Don’t forget to add the execution permission with:chmod +x /usr/local/bin/start_script.sh

Master your Raspberry Pi in 30 days
Sale: 25% off today. Download the eBook.
Uncover the secrets of the Raspberry Pi in a 30 days challenge.
Use a command line
The second option is to run a command on boot.
This is also an easy solution if you know exactly what you want to.
Issues may come from the command path.
Each command (htop, nano, mail, etc.) is installed at a specific location on your system (/usr/local/bin, /usr/bin, etc.).
Most of the commands will work directly on boot, without any path indication.
But for some programs, often less known, GitHub projects or thing like that (I’m thinking about AlexaPi for example), it’s not the case, you have to give the complete path.
If you have no idea what the executable location is, here is a few tips
You can use the “which” command to find it:which <COMMAND>
Here is an example:
Knowing that, you can use “/usr/bin/php” in your configuration file.
If it doesn’t work, the “find” command may also help yousudo find / -iname php
Find the program command
My last tip is for the graphical program that you run directly from the main menu.
As you don’t know the corresponding command line, it’s difficult to start it automatically.
But there is an easy find to find it:
- In the Main Menu, go to Preferences > Main Menu Editor.
- Select the application you want to start.
There are sorted the same way as on the main menu, so browse into the main categories if needed. - Then click on “Properties” on the right.
- A window shows up with the launcher properties.
In the command field, you can see the exact command used when you click on it in the main menu.
You have everything you need to apply one of the fourth solutions we have seen earlier.
If you need the path location, check my previous tip with the which command.